How To Remove Certificate From Windows VM/VMSS Using Custom Script Extension
For whatever reason we may want to remove a certificate from virtual machines. It could be both Azure Virtual Machines or Virtual Machine Scale Sets, actually, the steps are similar.
This post builds on top of the post about Azure Custom Script Extension. We will leverage this extension to run a script to delete a certificate from VMs. For more details and explanation please refer to the post mentioned above.
We will use ARM template to define and apply the extension but feel free to use Azure PowerShell as well, you just need to send the settings we specify in ARM template through PowerShell.
Contents:
Removing Certificate Installation
First and foremost, we need to remove certificate installation in case we specify it somewhere. For example, we could have certificates specified in secrets section of VM/VMSS as described here. If we don’t remove the certificate from definition, then it will be installed again during the next template deployment.
IMPORTANT: Removing from a definition will not delete certificates from existing VMs. It just will not install this certificate on new VMs that are created.
Therefore, we have to remove deprecated cert from existing VMs. Another option could be to somehow recreate running VMs either via reimaging or scaling up/down, but I think that running a script is simpler.
Preparing Script
In this section we are going to create a script with the code to delete certificate, upload it to a blob storage and make accessible using Shared Access Signature (SAS).
Writing Code
This stackoverflow question describes how to delete certificates. In this example we will assume that we want to delete certificate by thumbprint.
NOTE: You can write and ship logs to a storage account as described in this section of a related post.
param (
    [string] $Thumbprint
)

# Your certificate may be in a different location/store
$CertLocation = "Cert:\LocalMachine\My\$($Thumbprint)"

if (Test-Path $CertLocation)
{
    Write-Output ">> Removing $($CertLocation)"
    Get-ChildItem $CertLocation | Remove-Item
    Write-Output ">> Successfully removed certificate"
} else {
    Write-Output ">> Certificate was not found, skipping $($CertLocation)"
}
Putting Into Blob Storage
Here we just need to store our script in a blob storage of your choice and generate SAS for it. With the SAS token it will be downloadable for VMs.
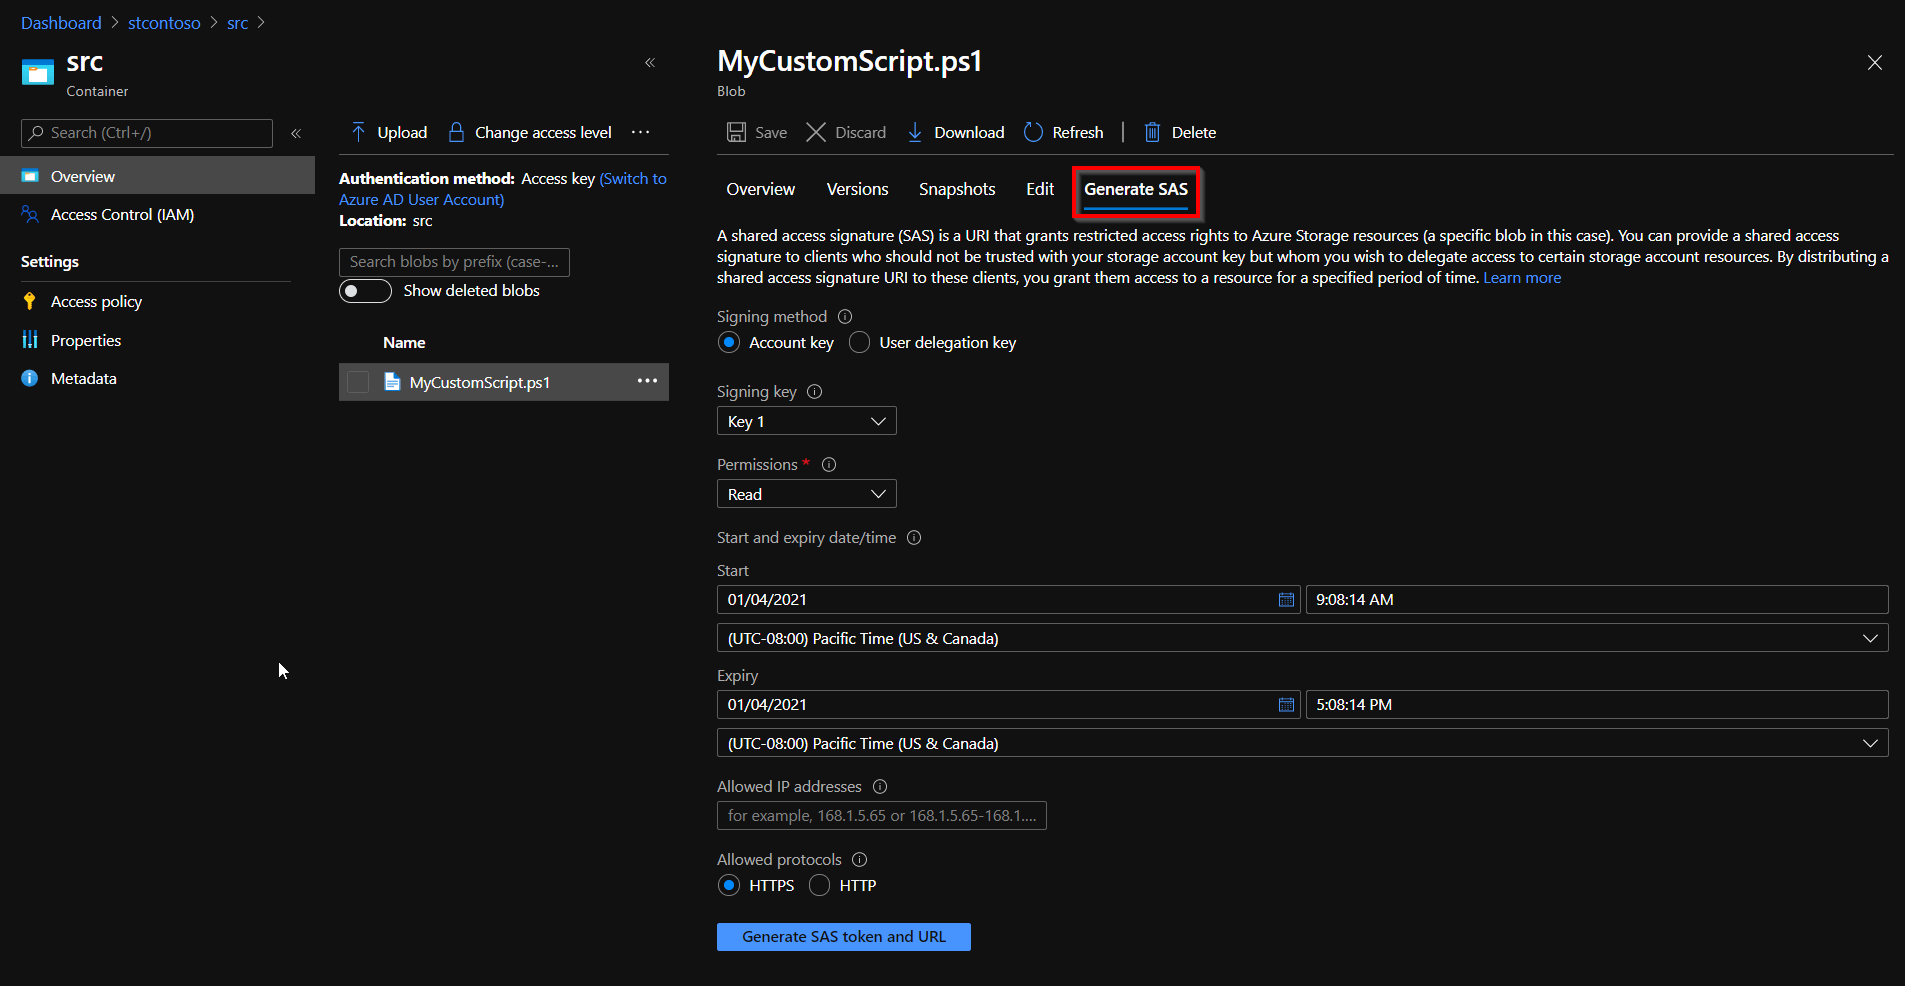
On the screenshot below MyCustomScript.ps1 is uploaded to stcontoso storage account in src container. After pressing the blue button, we need to save “Blob SAS URL” value for future use. We will put this URI into fileUris section of ARM template.
NOTE: You can use Managed Identity instead of SAS as described here.
 Generating SAS for script file
Creating ARM Template
Now we need to create an ARM template that contains our custom script extension definition, more information about extension itself please find here.
NOTES:
typeof the extension is the only difference between VM and VMSS casesfileUris- URI of our script with SAS tokentimestamp- if custom script extension is already installed, then changing timestamp value triggers rerun of the scriptcommandToExecute- invoking the script and passing Thumbprint argument
Virtual Machine Scale Sets (VMSS)
{
    "$schema": "http://schema.management.azure.com/schemas/2015-01-01/deploymentTemplate.json#",
    "contentVersion": "1.0.0.0",
    "parameters": {
        "vmssName": {
            "defaultValue": "vmss-contoso",
            "type": "string"
        }
    },
    "variables": {},
    "resources": [
        {
            "type": "Microsoft.Compute/virtualMachineScaleSets/extensions",
            "apiVersion": "2018-06-01",
            "name": "[concat(parameters('vmssName'),'/CustomScriptExtension')]",
            "location": "[resourceGroup().location]",
            "properties": {
                "publisher": "Microsoft.Compute",
                "type": "CustomScriptExtension",
                "typeHandlerVersion": "1.10",
                "autoUpgradeMinorVersion": true,
                "settings": {
                    "fileUris": [
                        "https://stcontoso.blob.core.windows.net/src/MyCustomScript.ps1?sv=2019-12-12&..."
                    ],
                    "timestamp": 202101051
                },
                "protectedSettings": {
                    "commandToExecute": "powershell -ExecutionPolicy Unrestricted -File MyCustomScript.ps1 -Thumbprint \"<your_certificate_thumbprint>\""
                }
            }
        }
    ]
}
Virtual Machines (VM)
{
    "$schema": "http://schema.management.azure.com/schemas/2015-01-01/deploymentTemplate.json#",
    "contentVersion": "1.0.0.0",
    "parameters": {
        "vmName": {
            "defaultValue": "vm-contoso",
            "type": "string"
        }
    },
    "variables": {},
    "resources": [
        {
            "type": "Microsoft.Compute/virtualMachines/extensions",
            "apiVersion": "2018-06-01",
            "name": "[concat(parameters('vmName'),'/CustomScriptExtension')]",
            "location": "[resourceGroup().location]",
            "properties": {
                "publisher": "Microsoft.Compute",
                "type": "CustomScriptExtension",
                "typeHandlerVersion": "1.10",
                "autoUpgradeMinorVersion": true,
                "settings": {
                    "fileUris": [
                        "https://stcontoso.blob.core.windows.net/src/MyCustomScript.ps1?sv=2019-12-12&..."
                    ],
                    "timestamp": 202101051
                },
                "protectedSettings": {
                    "commandToExecute": "powershell -ExecutionPolicy Unrestricted -File MyCustomScript.ps1 -Thumbprint \"<your_certificate_thumbprint>\""
                }
            }
        }
    ]
}
Applying Template
We are going to deploy our ARM template using Custom Deployment in Azure Portal.
To do this, search “deploy” in the top search bar and select “Deploy a custom template”. Then simply follow the steps on UI, more details here.
As a result, a deployment will be created, after it completes our custom script should be already applied and the certificate removed from virtual machines.
If something doesn’t work as expected, please read this troubleshooting section.