5 Ways To Deploy Bicep File With Parameters - Azure DevOps, PowerShell, CLI, Portal, Cloud Shell
After we are done with creating a Bicep file, the next question is how to deploy it to Azure. There are many ways to do it, that’s why we’ll collect them in this one post (at least, most of them).
Deploying Azure Bicep files can be done in multiple ways: Azure CLI or Azure PowerShell commands, in Azure Portal via Custom Deployment functionality or Cloud Shell, as one of the steps in CI/CD pipeline (for example, Azure Pipelines). Another approach is to convert Bicep file into ARM template JSON file and use tooling for ARM templates to run a deployment.
In general, the ways we discuss below is just a variation of deploying ARM templates. In some cases, tools already have built-in support for Bicep so that they build ARM template from Bicep file for us.
NOTE: All approaches mentioned in this post are applicable to ARM templates as well. Some tools already have built-in support for Bicep, but as of July 2021, the support for ARM templates is better than for Bicep.
Contents:
- Overview
- Sample Bicep File With Parameters
- Azure Portal - Custom Deployment
- Azure CLI
- Azure PowerShell
- Cloud Shell
- CI/CD Pipeline - Azure DevOps
- Related Posts
- Useful Links
Overview
The main goal of this post is to equip the reader with different ways how to deploy a Bicep file.
In the first section, we are going to define a simple template that will be used in all following examples. And for the sake of completeness, we will have a parameter file as well.
The following sections are dedicated to different ways of deploying a Bicep file, each of them might be more preferable in different situations:
- Manually or one-time: Azure Portal, Cloud Shell, Azure PowerShell, Azure CLI
- Automation: Azure PowerShell and Azure CLI
- CI/CD pipeline: Azure DevOps - both YAML and Classic UI pipelines
Sample Bicep File With Parameters
First, let’s create a sample Bicep file that we will deploy in our examples. It could be anything you want, but for this post I decided to go with a storage account as an example.
Additionally, we are going to have a simple parameter file. Read more about parameters in this post Parameters In Azure Bicep - Ultimate Guide With Examples. It covers parameters in Bicep thoroughly.
NOTE: Sample bicep file has targetScope='resourceGroup' which is the default value. If you are planning to deploy at a different scope (e.g. subscription, managementGroup, or tenant), then you need to adjust the Bicep file accordingly.
Here’s main.bicep file, note that it has one required parameter, and one optional:
// targetScope = 'resourceGroup'  -  this is default value

param storageAccountName string
param location string = resourceGroup().location

resource stg 'Microsoft.Storage/storageAccounts@2021-04-01' = {
  name: storageAccountName
  location: location
  sku: {
    name: 'Standard_LRS'
  }
  kind: 'StorageV2'
}
The parameter file main.parameters.json contains only one parameter which is required:
{
  "$schema": "https://schema.management.azure.com/schemas/2019-04-01/deploymentParameters.json#",
  "contentVersion": "1.0.0.0",
  "parameters": {
    "storageAccountName": {
      "value": "stcontoso"
    }
  }
}
Azure Portal - Custom Deployment
The first way to deploy a bicep file we will discuss is using Custom Deployment feature right in the Azure Portal. It is handy for one-time deployments and experiments.
I personally use this approach quite often, especially when writing these blog posts, it allows to quickly and easily deploy an ARM template and verify code.
1. Build Bicep File Into ARM Template
At the moment of writing, Custom deployment in Azure Portal works only with ARM templates and not Bicep files, however, this should change in the future, so it might be already available when you are reading this post.
So, we need to compile our main.bicep into a corresponding ARM template file. There are a couple of ways to do this:
- Install Bicep CLI on your machine using any of the options described in Setup your Bicep development environment and run
bicep build main.bicepin the folder where your bicep file lives. - Go to Bicep Playground and paste your bicep code in the left pane, the compiled ARM template will appear on the right. Quick and easy, but won’t work if you have multiple files, e.g. modules.
As a result, we should have these three files:
main.bicep- original Bicep filemain.json- ARM template that was compiled from Bicep filemain.parameters.json- our parameter file
2. Submit Custom Deployment
Now, we have both the compiled ARM template and the corresponding parameter file. Follow these steps to submit a deployment:
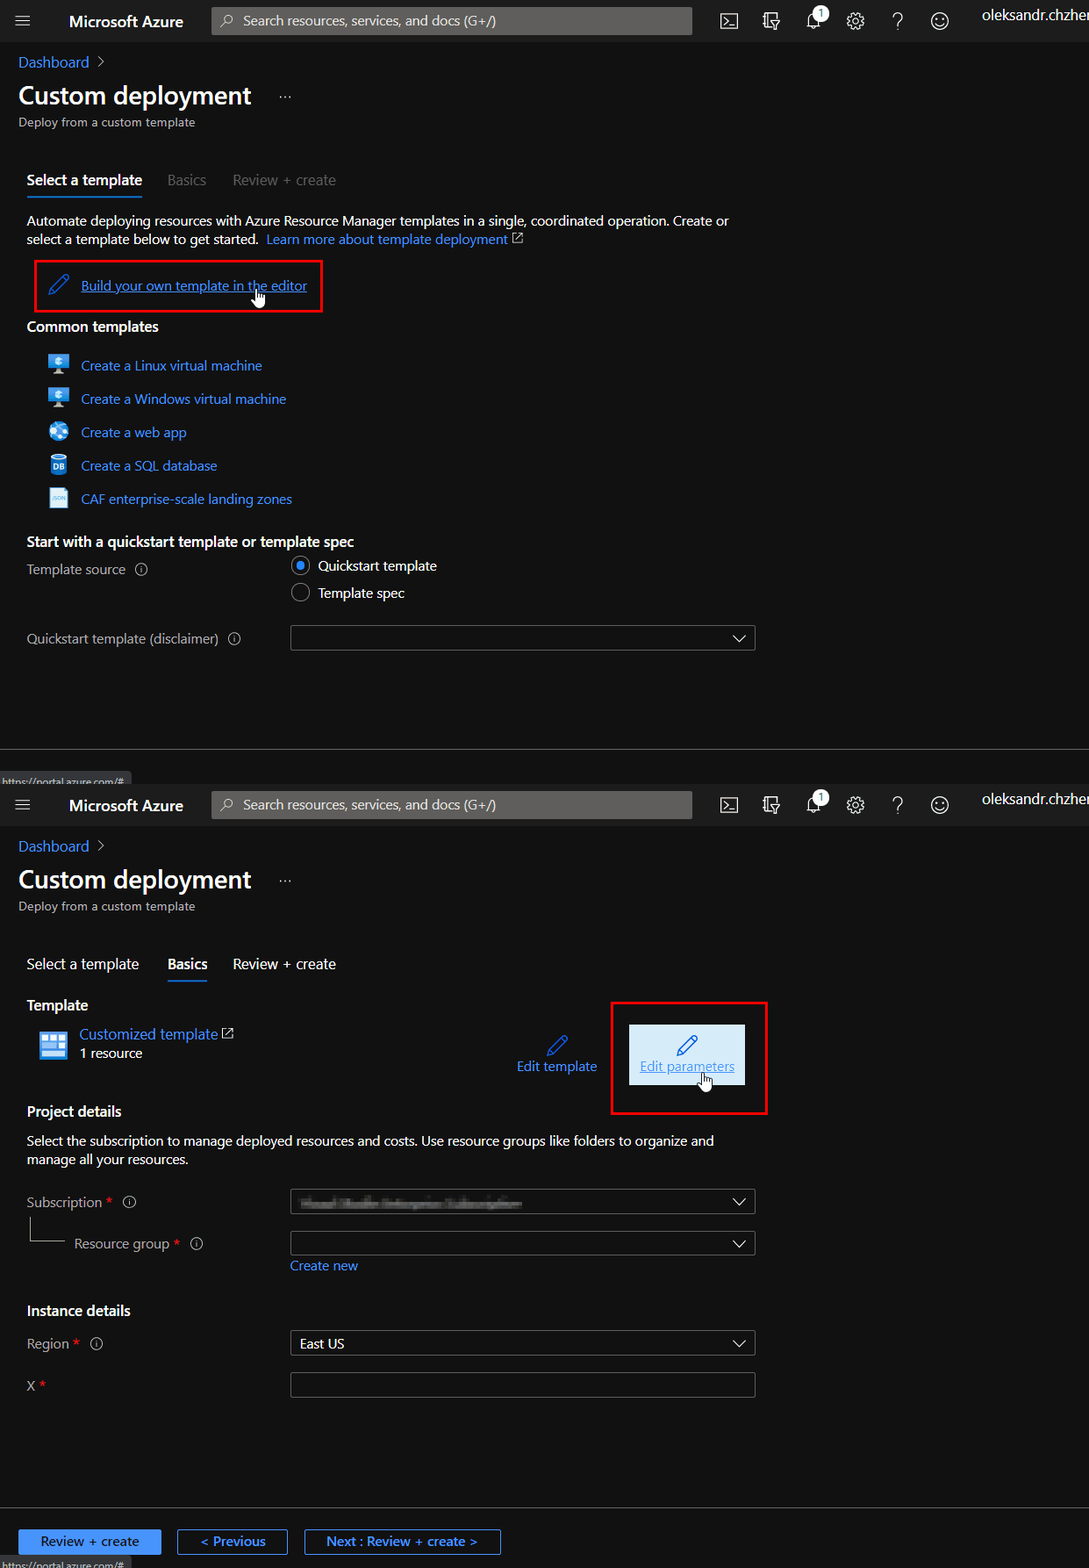
- Go to Custom deployment page in Azure Portal
- Click “Build your own template in the editor”, paste your code from
main.jsonand save - Click “Edit parameters”, paste your code from
main.parameters.jsonand save - Specify subscription, resource group and modify parameter values if needed
- Follow the steps to review and create a deployment
The animated image below shows how the Custom deployment page looks like and where to add your ARM template and parameter file.
Azure CLI
Azure CLI versions 2.20.0 and above install Bicep as part of the CLI, so you might want to get the latest version of Azure CLI. For more details, please refer to Install and manage via Azure CLI.
Now, given both Bicep and Azure CLI, we can deploy our bicep file with parameters at a scope we need using the following commands:
| Deployment Scope | Azure CLI Command |
|---|---|
| Resource group | az deployment group create |
| Subscription | az deployment sub create |
| Management group | az deployment mg create |
| Tenant | az deployment tenant create |
NOTE: targetScope of main.bicep must match the scope of the deployment, so our Bicep file should be modified if you are deploying at subscription, managementGroup, or tenant scopes.
Comments about about passing parameters:
--parametersargument is used to pass parameters, it can be specified multiple times--parameters @main.parameters.json- passes local parameter file--parameters https://example.com/main.parameters.json- passes remote parameter file--parameters myParam1='myValue1' myParam2='myValue2'- passes individual parameters--parameters myParam=@paramfile.txt- reads parameter value from a local file
Below is an example of deploying at the scope of a resource group. Please note that the following example uses bash language.
NOTE: Name of the deployment which is passed --name myStorageDeployment1 should be unique if we don’t want to override resource group deployment history. Sometimes losing deployment history is not acceptable, then it’s worth adding uniqueness to the deployment name.
# Create resource group if not exists
az group create \
  --name rg-bicep \
  --location westus

# Deploy
az deployment group create \
  --name myStorageDeployment1 \
  --resource-group rg-bicep \
  --template-file main.bicep \
  --parameters @main.parameters.json \
  --parameters location='centralus'
Azure PowerShell
Setting up Bicep with Azure PowerShell is different, even though Az module versions 5.6.0 and later integrate with Bicep when deploying files with *.bicep extension, Azure PowerShell expects Bicep be already installed and available in the PATH.
So, you need to install Bicep manually, and Azure PowerShell v5.6.0+ will pick it up automatically. Read more about Bicep and Azure PowerShell
With Azure PowerShell we can also deploy at different scopes by using the following commands:
| Deployment Scope | Azure PowerShell Command |
|---|---|
| Resource group | New-AzResourceGroupDeployment |
| Subscription | New-AzDeployment |
| Management group | New-AzManagementGroupDeployment |
| Tenant | New-AzTenantDeployment |
NOTE: targetScope of main.bicep must match the scope of the deployment, so our Bicep file should be modified if you are deploying at subscription, managementGroup, or tenant scopes.
Now, let’s look at an example how to deploy our Bicep file with parameters using Azure PowerShell. Note that we pass -TemplateParameterFile main.parameters.json as well as -location centralus to override location parameter.
NOTE: Name of the deployment which is passed -Name myStorageDeployment1 should be unique if we don’t want to override resource group deployment history. Sometimes losing deployment history is not acceptable, then it’s worth adding uniqueness to the deployment name.
# Create resource group if not exists
New-AzResourceGroup `
  -Name rg-bicep `
  -Location westus

New-AzResourceGroupDeployment `
  -Name myStorageDeployment1 `
  -ResourceGroupName rg-bicep `
  -TemplateFile main.bicep `
  -TemplateParameterFile main.parameters.json `
  -location centralus
Cloud Shell
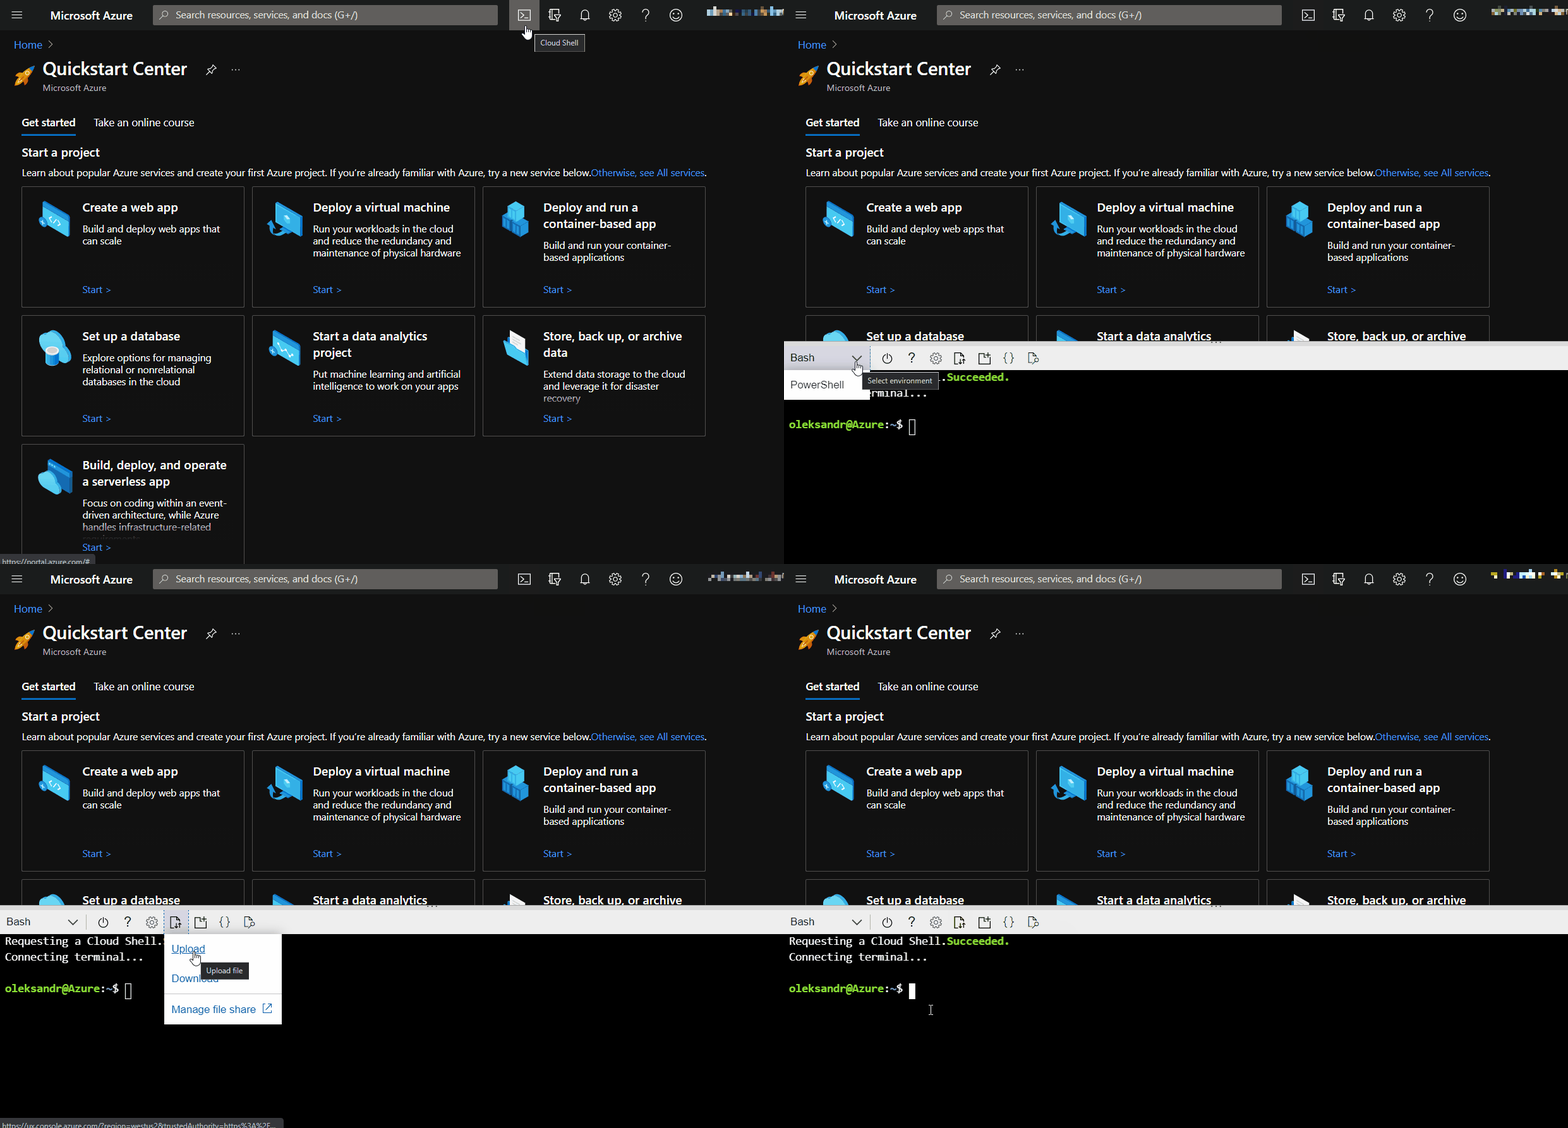
Cloud Shell is one more convenient way to do ad-hoc deployments of Bicep files. Cloud Shell is interesting for us because it allows running both Azure CLI and Azure PowerShell commands in the Azure Portal.
Follow these steps to deploy a Bicep file with parameters:
- Go to Azure Portal
- Open Cloud Shell
- Select Bash or PowerShell
- Upload
main.bicepandmain.parameters.json - Run commands from Azure CLI and Azure PowerShell sections depending on which language you chose in step 3
 Deploy Bicep file using Cloud Shell
CI/CD Pipeline - Azure DevOps
Last but not least, we mention deploying Bicep files (or ARM templates) using CI/CD pipeline. For production, this is usually the best approach to deploy infrastructure code since it establishes a standard way of applying changes.
Deploy Azure Bicep In YAML and Classic Release Pipelines (CI/CD) - Azure DevOps post talks about Bicep and Azure Pipelines in depth, here are some of the things covered in that post:
- Implementing with YAML pipeline and/or Classic Release Pipeline
- Using both Azure CLI and ARM Template Deployment task to submit a deployment to Azure
Related Posts
- Deploy Azure Bicep In YAML and Classic Release Pipelines (CI/CD) - Azure DevOps
- Parameters In Azure Bicep - Ultimate Guide With Examples
- Variables In Azure Bicep - From Basics To Advanced
- Learn Modules In Azure Bicep - Basics To Advanced, How It Works, Nested Modules, Outputs, Scopes
- Reference New Or Existing Resource In Azure Bicep
- Child Resources In Azure Bicep - 3 Ways To Declare, Loops, Conditions
- Using Key Vault Secrets As Secure Parameters In Azure Bicep - Template & Module Inputs
- Create Resource Group With Azure Bicep and Deploy Resources In It
- Parse ARM Template JSON Outputs In Azure Pipelines
 Deploy from a custom template