Deploy Azure Bicep In YAML and Classic Release Pipelines (CI/CD) - Azure DevOps
After Bicep files are created, most likely we will want to use them to deploy our resources to Azure in some way. Obviously, this is the main reason why Bicep files and ARM templates exist.
The best way to deploy infrastructure code (Bicep files and ARM templates) is through CI/CD pipeline. In this post, we will look how to achieve that with Azure DevOps Pipelines.
Contents:
- Overview
- Sample Bicep File and Parameters
- YAML Pipeline
- Classic Release Pipeline
- Related Posts
- Useful Links
Overview
In general, managing cloud resources by following Infrastructure as Code approach is the right way to go. This makes our infrastructure consistent, automated, and easier to manage in the long run.
Infrastructure code should be stored in a source control system (e.g. Git) and deployed in a similar way to the application code, additionally, any infrastructure changes should be peer-reviewed before being applied in production.
As you might have guessed, Azure Bicep along with Azure Pipelines are the tools that allow implementing the Infrastructure as Code concepts in Azure, this is what we are going to discuss in this post. Of course, you can use other tools instead of Azure Pipelines if you wish :-).
We will cover different variations of deploying Bicep files in Azure Pipelines, for example: using YAML and Classic pipelines, using Azure CLI or ARM Template Deployment task, passing parameters with or without a parameter file.
Sample Bicep File and Parameters
Let’s first come up with a sample Bicep file which will be used in all our examples. It doesn’t matter which resources we choose to deploy in the template, that’s why we only have a simple storage account.
Below is our main.bicep file, please note that we have two parameters:
storageAccountName- required, we’ll pass it through a parameter filelocation- optional since it has a default value, we’ll override it during deployment invocation
param storageAccountName string
param location string = resourceGroup().location

resource stg 'Microsoft.Storage/storageAccounts@2021-04-01' = {
  name: storageAccountName
  location: location
  sku: {
    name: 'Standard_LRS'
  }
  kind: 'StorageV2'
}
In addition to the main template, here is our small main.parameters.json file where we pass storageAccountName parameter.
{
  "$schema": "https://schema.management.azure.com/schemas/2019-04-01/deploymentParameters.json#",
  "contentVersion": "1.0.0.0",
  "parameters": {
    "storageAccountName": {
      "value": "stcontoso"
    }
  }
}
YAML Pipeline
Great, so now we have main.bicep and main.parameters.json files which we want to deploy through a YAML pipeline. There are a few ways to do that in Azure Pipelines, we will talk about Azure CLI and ARM template deployment task in this section.
Azure CLI
Luckily, Azure CLI versions 2.20.0 and later already contain Bicep, this means that when using Azure CLI we can pass Bicep files right away and they will be compiled into ARM templates without any involvement from our side.
I wanted to show both shorter and longer versions of the pipeline code that you might have when deploying Bicep files.
Minimal pipeline just shows one step to deploy a template, on the other hand, Full Pipeline is closer to how your code might look like in production when you create an artifact and have multiple stages.
NOTE: In the snippets below, Bash is used for Azure CLI examples, however, you could use PowerShell Core there as well (not important), in this case escaping line breaks would be with a backtick, not backslash.
Minimal Pipeline
The pipeline below contains only one step - Azure CLI task which deploys our template. Usually, your pipeline would be more complicated, but this snippet nicely illustrates the main idea.
NOTES:
- Line 16 - creates a resource group if it doesn’t exist but does nothing if it’s already there
- Line 21 -
$(Build.BuildNumber)is passed as a name to have unique records in the resource group deployment history, if we specify static name then subsequent deployments will overwrite the deployment history - Lines 23 and 24 -
$(Build.SourcesDirectory)in values of the arguments means that we reference files from the checked out repository directly - Line 24 - note
@symbol at the beginning of the filename, it means that we specify local file - Line 25 -
locationparameter is passed inline, this can be used to override values
1
2
3
4
5
6
7
8
9
10
11
12
13
14
15
16
17
18
19
20
21
22
23
24
25
trigger:
- master

pool:
  vmImage: 'ubuntu-latest'

steps:
- task: AzureCLI@2
  displayName: 'Deploy Bicep file'
  inputs:
    azureSubscription: 'MyAzureSubscription'
    scriptType: 'bash'
    scriptLocation: 'inlineScript'
    inlineScript: |
      # Creating a resource group
      az group create \
        --name rg-bicep \
        --location westus
      # Deploying Bicep file
      az deployment group create \
        --name $(Build.BuildNumber) \
        --resource-group rg-bicep \
        --template-file $(Build.SourcesDirectory)/src/main.bicep \
        --parameters @$(Build.SourcesDirectory)/src/main.parameters.json \
        --parameters location='centralus'
Full Pipeline
Even though the previous minimal example works, it is unlikely that your production pipeline will look like this. Most likely, you’ll come up with something similar to the following example.
The main difference here is that it creates an artifact first and later consumes it to deploy the templates. Besides Bicep files, an artifact usually contains code of your application, for example, binaries and configuration files.
NOTES:
- There are two stages:
BuildandDEV - In
Buildstage, we create an artifact nameddropby copying and publishing template files - In
DEVstage, we first download artifact and then deploy Bicep file - Line X and Y - files are now located at
$(System.ArtifactsDirectory)/drop
1
2
3
4
5
6
7
8
9
10
11
12
13
14
15
16
17
18
19
20
21
22
23
24
25
26
27
28
29
30
31
32
33
34
35
36
37
38
39
40
41
42
43
44
45
46
47
48
49
50
51
52
53
54
55
56
57
58
59
60
61
62
trigger:
- master

pool:
  vmImage: 'ubuntu-latest'

stages:
- stage: Build
  jobs:
  - job: Build
    steps:

    - script: echo Hello, world!
      displayName: 'Run Build steps'

    - task: CopyFiles@2
      displayName: 'Include templates in the artifact'
      inputs:
        SourceFolder: 'src'
        Contents: |
          main.bicep
          main.parameters.json
        TargetFolder: '$(Build.ArtifactStagingDirectory)'

    - task: PublishBuildArtifacts@1
      displayName: 'Publish artifact'
      inputs:
        PathtoPublish: '$(Build.ArtifactStagingDirectory)'
        ArtifactName: 'drop'
        publishLocation: 'Container'

- stage: DEV
  jobs:
  - job: Deploy
    steps:

    - task: DownloadBuildArtifacts@0
      displayName: 'Download artifact'
      inputs:
        buildType: 'current'
        downloadType: 'single'
        artifactName: 'drop'
        downloadPath: '$(System.ArtifactsDirectory)'

    - task: AzureCLI@2
      displayName: 'Deploy Bicep file'
      inputs:
        azureSubscription: 'MyAzureSubscription'
        scriptType: 'bash'
        scriptLocation: 'inlineScript'
        inlineScript: |
          # Creating a resource group
          az group create \
            --name rg-bicep \
            --location westus
          # Deploying Bicep file
          az deployment group create \
            --name $(Build.BuildNumber) \
            --resource-group rg-bicep \
            --template-file $(System.ArtifactsDirectory)/drop/main.bicep \
            --parameters @$(System.ArtifactsDirectory)/drop/main.parameters.json \
            --parameters location='centralus'
ARM Template Deployment Task
A standard way to deploy ARM templates in Azure Pipelines is to use “ARM template deployment” task. The problem is that at the time of the writing (July 2021) this task doesn’t support Bicep yet and only accepts ARM template JSON files.
However, this could be easily solved by adding a step where Bicep files are compiled into ARM templates, and we can use Azure CLI for this.
NOTES:
- Azure CLI is used to compile
main.bicepintomain.jsonARM template, an alternative way is to install Bicep CLI on an agent by following these instructions - Bicep CLI is automatically installed when command requiring Bicep is invoked in Azure CLI v2.20.0+, but you can also run
az bicep install - The example below shows the minimal pipeline that works, for example, it uses files from the checked out repo without creating/consuming any artifacts
1
2
3
4
5
6
7
8
9
10
11
12
13
14
15
16
17
18
19
20
21
22
23
24
trigger:
- master

pool:
  vmImage: 'ubuntu-latest'

steps:
    - script: az bicep build --file src/main.bicep
      displayName: 'Compile Bicep file'

    - task: AzureResourceManagerTemplateDeployment@3
      displayName: 'Deploy ARM Template'
      inputs:
        deploymentScope: 'Resource Group'
        azureResourceManagerConnection: 'MyARMConnection'
        subscriptionId: 'c6960c1a-4c4a-488a-8ca1-c70e67cb0945'
        action: 'Create Or Update Resource Group'
        resourceGroupName: 'rg-bicep'
        location: 'West US'
        templateLocation: 'Linked artifact'
        csmFile: '$(Build.SourcesDirectory)/src/main.json'
        csmParametersFile: '$(Build.SourcesDirectory)/src/main.parameters.json'
        overrideParameters: '-location centralus'
        deploymentMode: 'Incremental'
Classic Release Pipeline
The idea in Classic Pipelines is the same, the only difference is the user interface, here we will use UI instead of YAML to author the pipeline. Also, some features differ between YAML and Classic experiences, but it is not relevant for this post.
This section will consist of two parts:
- Build - creating and publishing an artifact
- Release - deploying the templates
Build
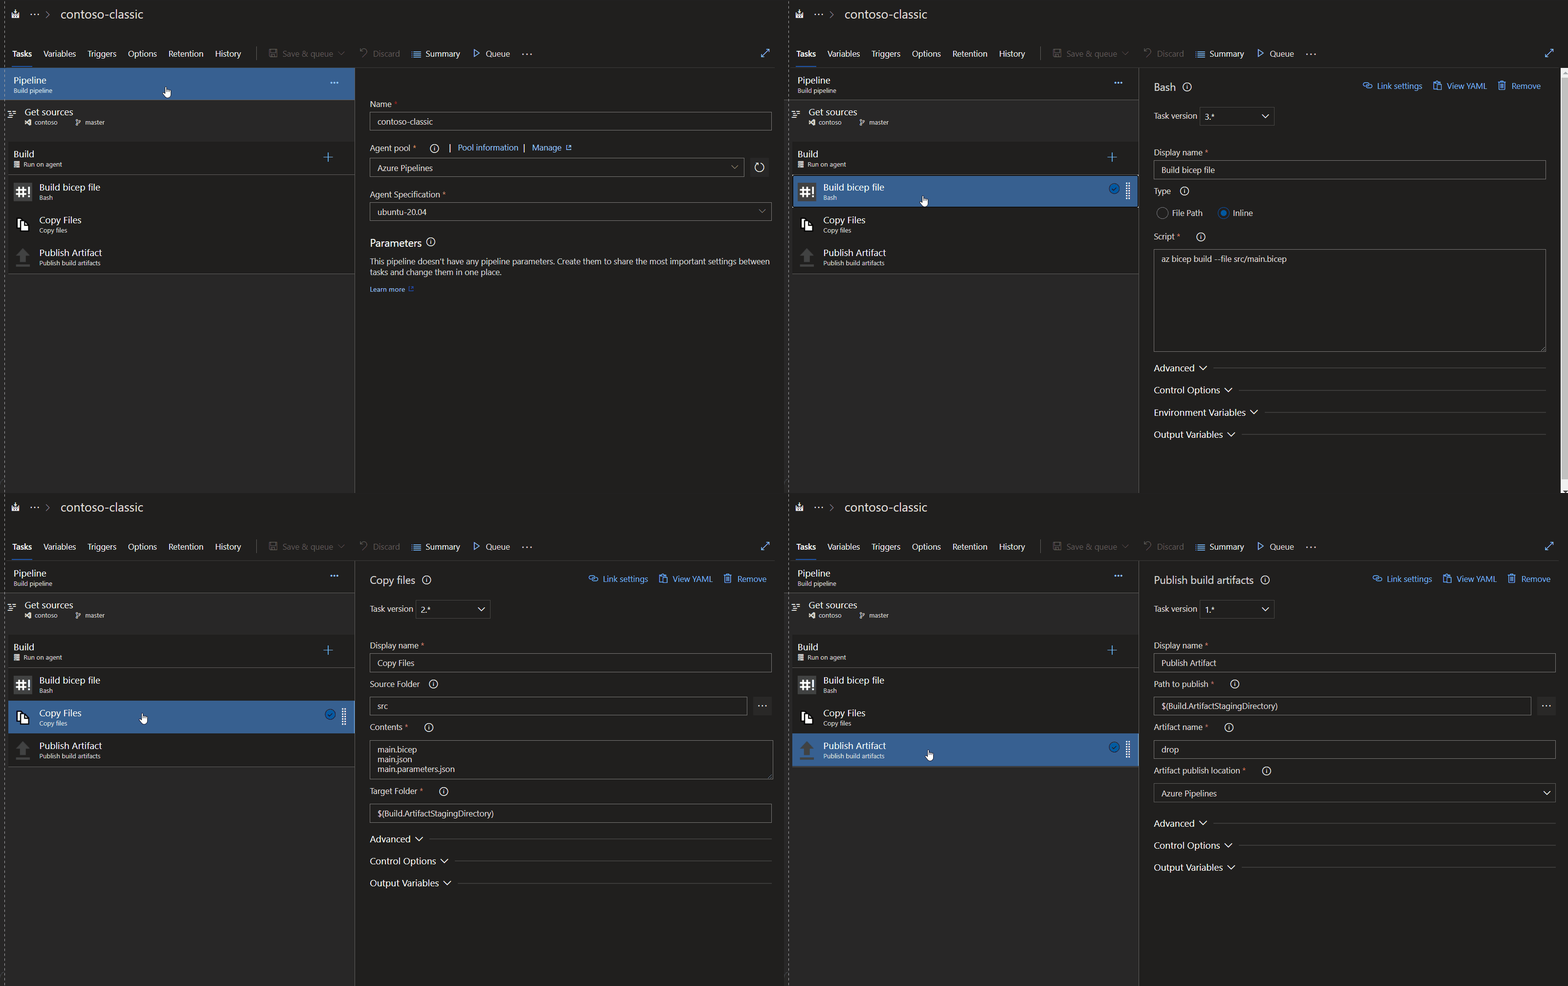
The build pipeline is very similar to the Build stage in Full Pipeline, but here we use Classic UI experience to add and configure steps.
Our build pipeline consist of the following steps/tasks:
- Compile bicep file - step which compiles our
main.bicepintomain.jsonwhich can be used with ARM template deployment task, you’ll see it the release pipeline - Copy files - moving
main.bicep,main.json, andmain.parameters.jsonto artifact staging directory to be published in the next step - Publish artifact - creating an artifact named
dropin Azure Pipelines (all default settings)
The animated image below shows how the steps look like.
Release
While the Build pipeline lives in the same place as YAML pipelines (Pipelines → Pipelines), Classic UI Releases are located in a different place (Pipelines → Releases).
We will not go into the details of creating a release pipeline, but instead will see tasks for deploying templates with Azure CLI or ARM Template Deployment task. For more information about release pipeline, please refer to the documentation.
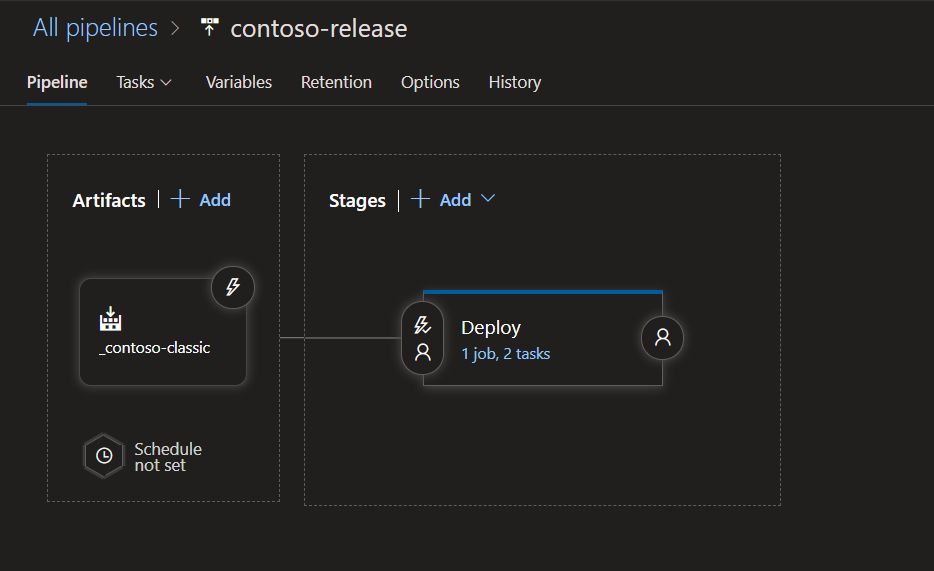
On a high level, our release pipeline consists of these two parts:
- Artifact “_contoso-classic” - this is the name to refer to the output of the Build pipeline, tasks in “Deploy” stage use
$(System.DefaultWorkingDirectory)/_contoso-classic/dropto specify template and parameter files - Stage “Deploy” - stage where we deploy the template to Azure
As with YAML Pipeline, we will cover deployment with both Azure CLI and ARM Template Deployment Task, they are represented as two separate tasks inside of the “Deploy” stage (but do the same thing).
Azure CLI
As we already know from previous sections, Azure CLI can be used to deploy Bicep templates. Again, the idea is the same as with YAML pipeline, but the user experience is different.
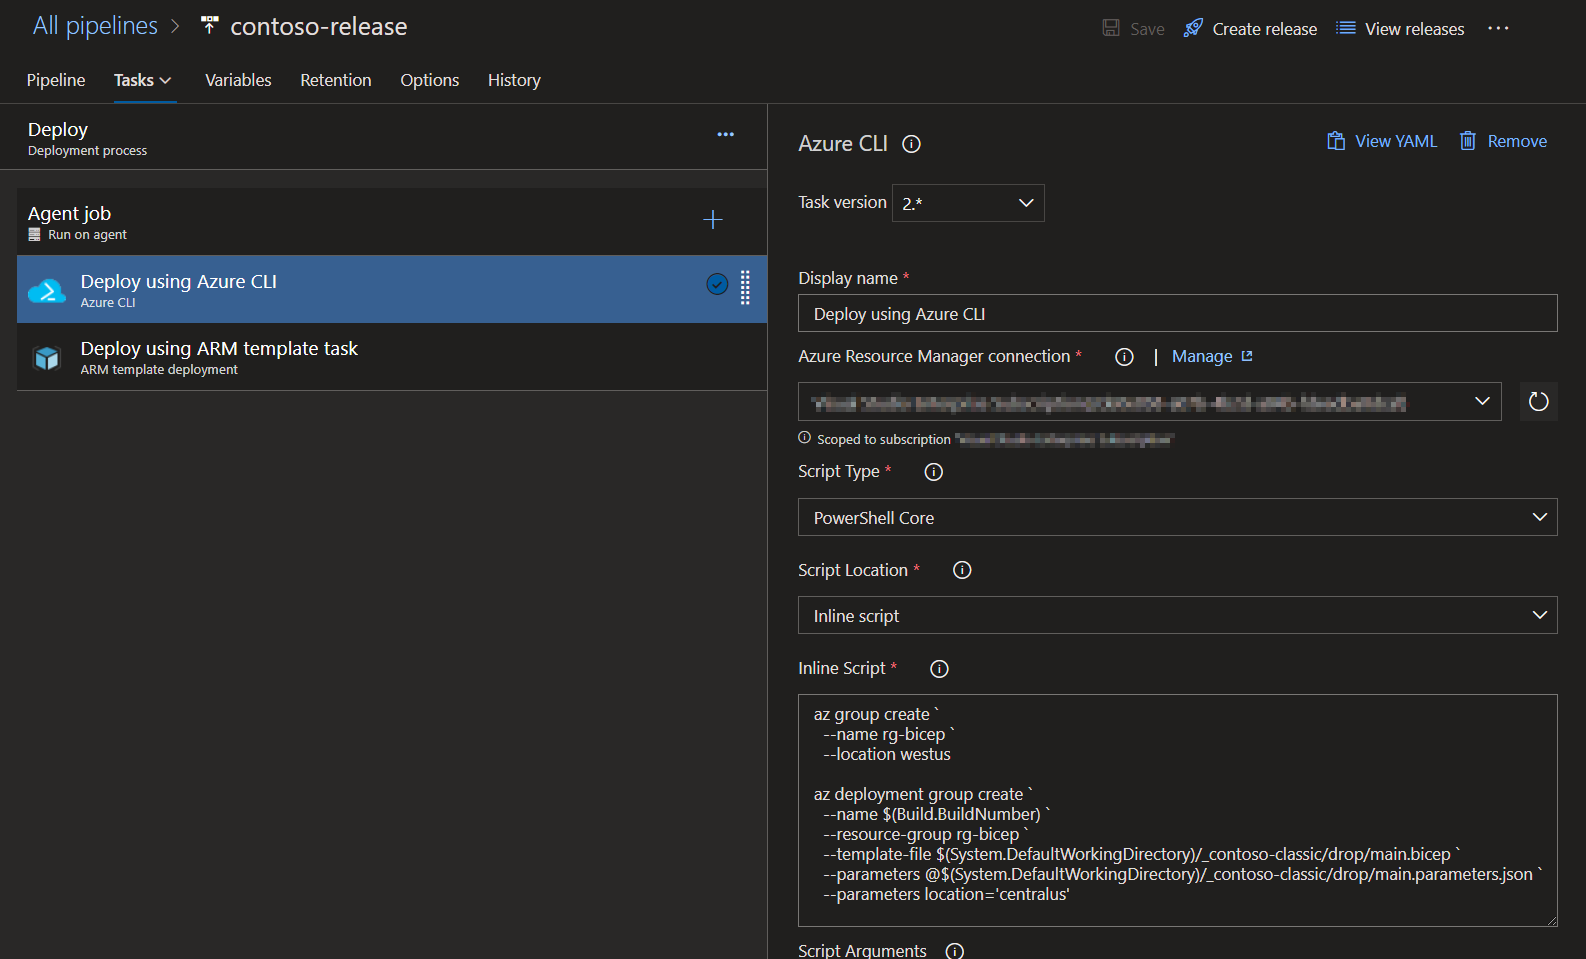
NOTES:
- This example uses PowerShell Core in contrast to previous Azure CLI examples which used Bash. However, the difference here is only in backtick vs backslash.
- Note
_contoso-classicpart in the path to the template files - The Azure CLI script is listed below, see comments for this code in Minimal Pipeline section
az group create `
  --name rg-bicep `
  --location westus

az deployment group create `
  --name $(Build.BuildNumber) `
  --resource-group rg-bicep `
  --template-file $(System.DefaultWorkingDirectory)/_contoso-classic/drop/main.bicep `
  --parameters @$(System.DefaultWorkingDirectory)/_contoso-classic/drop/main.parameters.json `
  --parameters location='centralus'
In the task configuration we just need to select ARM connection, specify script type, and add the script itself.
ARM Template Deployment Task
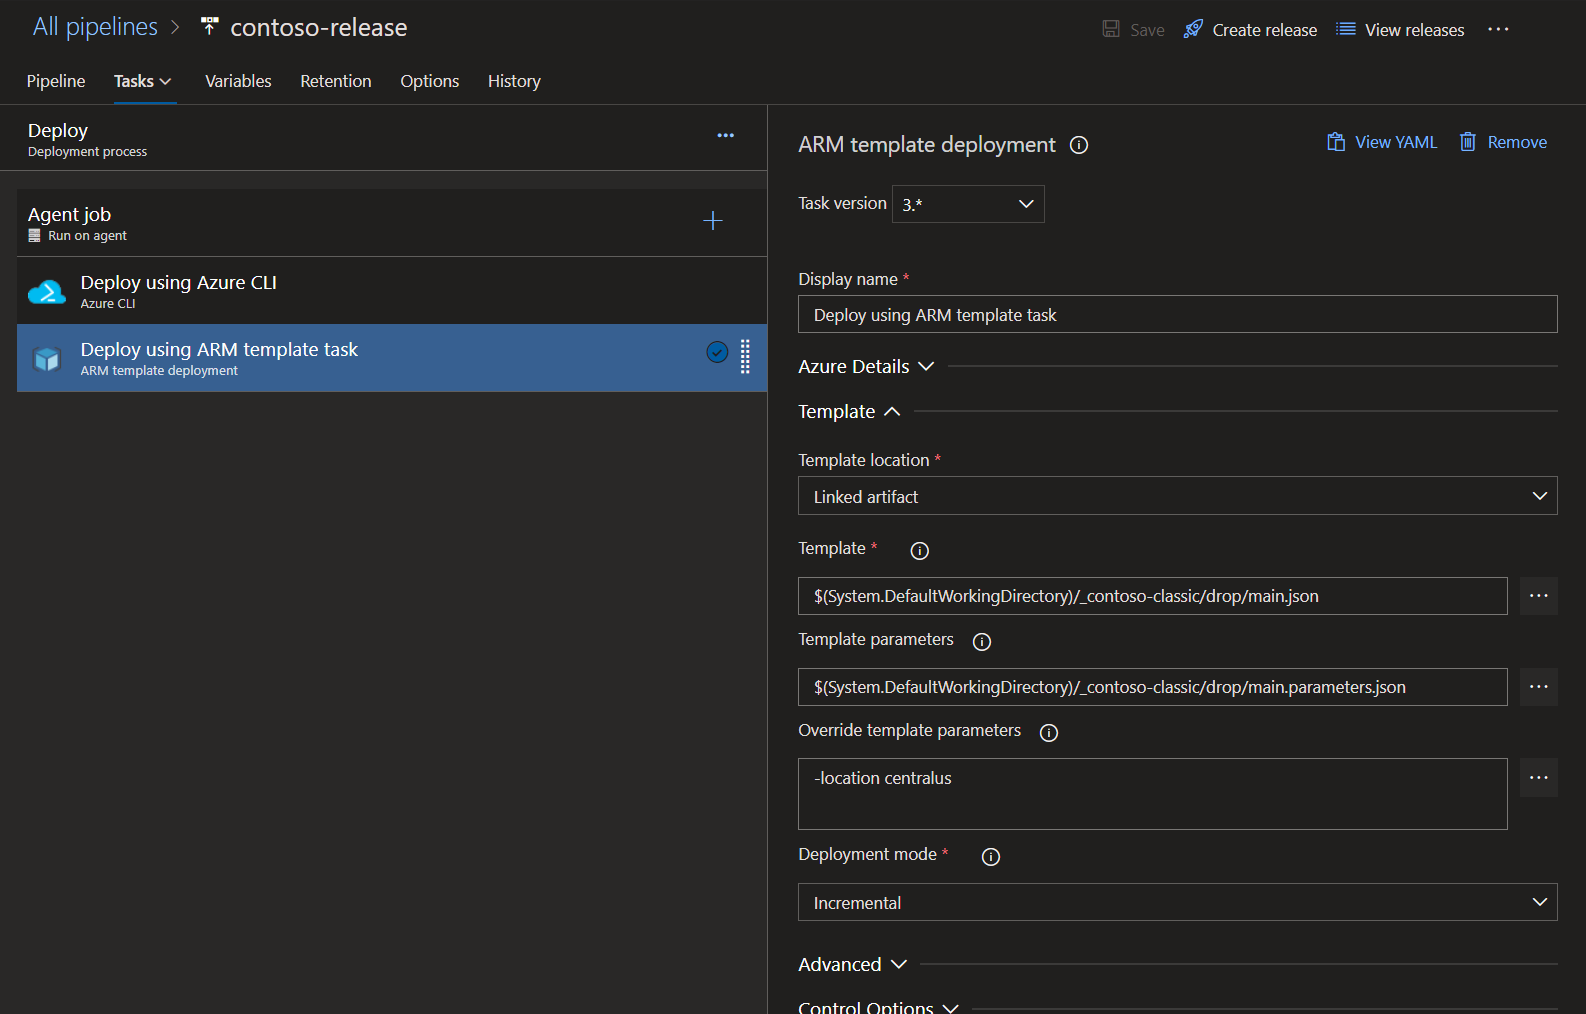
Using ARM template deployment task in Classic Release is very simple, just a couple of things to pay attention to:
- As of July 2021, ARM template deployment task doesn’t support Bicep files directly, so we must use
main.jsonwhich was compiled frommain.bicepin the Build pipeline - The location of the
main.jsonandmain.parameters.jsonis in$(System.DefaultWorkingDirectory)/_contoso-classic/dropdirectory
The image below shows the template configuration of the ARM task, note that Azure connection details are minimized to save space.
Related Posts
- 5 Ways To Deploy Bicep File With Parameters - Azure DevOps, PowerShell, CLI, Portal, Cloud Shell
- Parameters In Azure Bicep - Ultimate Guide With Examples
- Variables In Azure Bicep - From Basics To Advanced
- Learn Modules In Azure Bicep - Basics To Advanced, How It Works, Nested Modules, Outputs, Scopes
- Reference New Or Existing Resource In Azure Bicep
- Child Resources In Azure Bicep - 3 Ways To Declare, Loops, Conditions
- Create Resource Group With Azure Bicep and Deploy Resources In It
- Using Key Vault Secrets As Secure Parameters In Azure Bicep - Template & Module Inputs
- Parse ARM Template JSON Outputs In Azure Pipelines
- Reference() Function Explained With Examples - ARM Template
 Classic UI build pipeline
 Classic UI release pipeline
 Azure CLI step
 ARM template task