How To RDP/SSH Into Azure VMSS VM Instances
In this post we will review how to connect to Virtual Machine Scale Set instances using RDP for Windows and SSH for Linux.
We will cover the following approaches:
- Connecting directly to virtual machines
- Connecting through a jumpbox
- Leveraging Azure Bastion
NOTE: We will mainly discuss networking part but not detailed steps how to use RDP or SSH, there are already a lot of great articles on these topics. Also, throughout the post most examples are for RDP and 3389 port, however, for SSH case it is mainly just using port 22 instead of 3389.
Contents:
Connecting Directly To VMs
Let’s see how we can connect to virtual machines inside of VMSS from outside of the virtual network, for example, from a developer’s machine.
NOTE: Here we are discussing the case when VMSS is placed behind a load balancer. If your virtual machines in a scale set have individual IP addresses, then skip the section about inbound NAT pool and rules.
To be able to connect to the VMSS we need to check that inbound NAT rules and network security group are configured correctly.
Inbound NAT Pool and Rules
Since our virtual machines are placed behind a load balancer and all have one public IP address which is assigned to the load balancer, we want to use this IP address to somehow reach RDP 3389 or SSH 22 port of a particular virtual machine.
Inbound network address translation rules that are configured on the load balancer help us achieve that. Essentially, inbound NAT rule specifies where the load balancer should forward incoming request arriving at a particular port.
What we need:
- Create a load balancer Inbound NAT Pool
- Associate VMSS with the this pool
When creating a resource through Azure Portal, these inbound NAT pool and rules are set up by default but it’s better to check whether they are present especially if you create your resource in a different way.
Azure Portal View
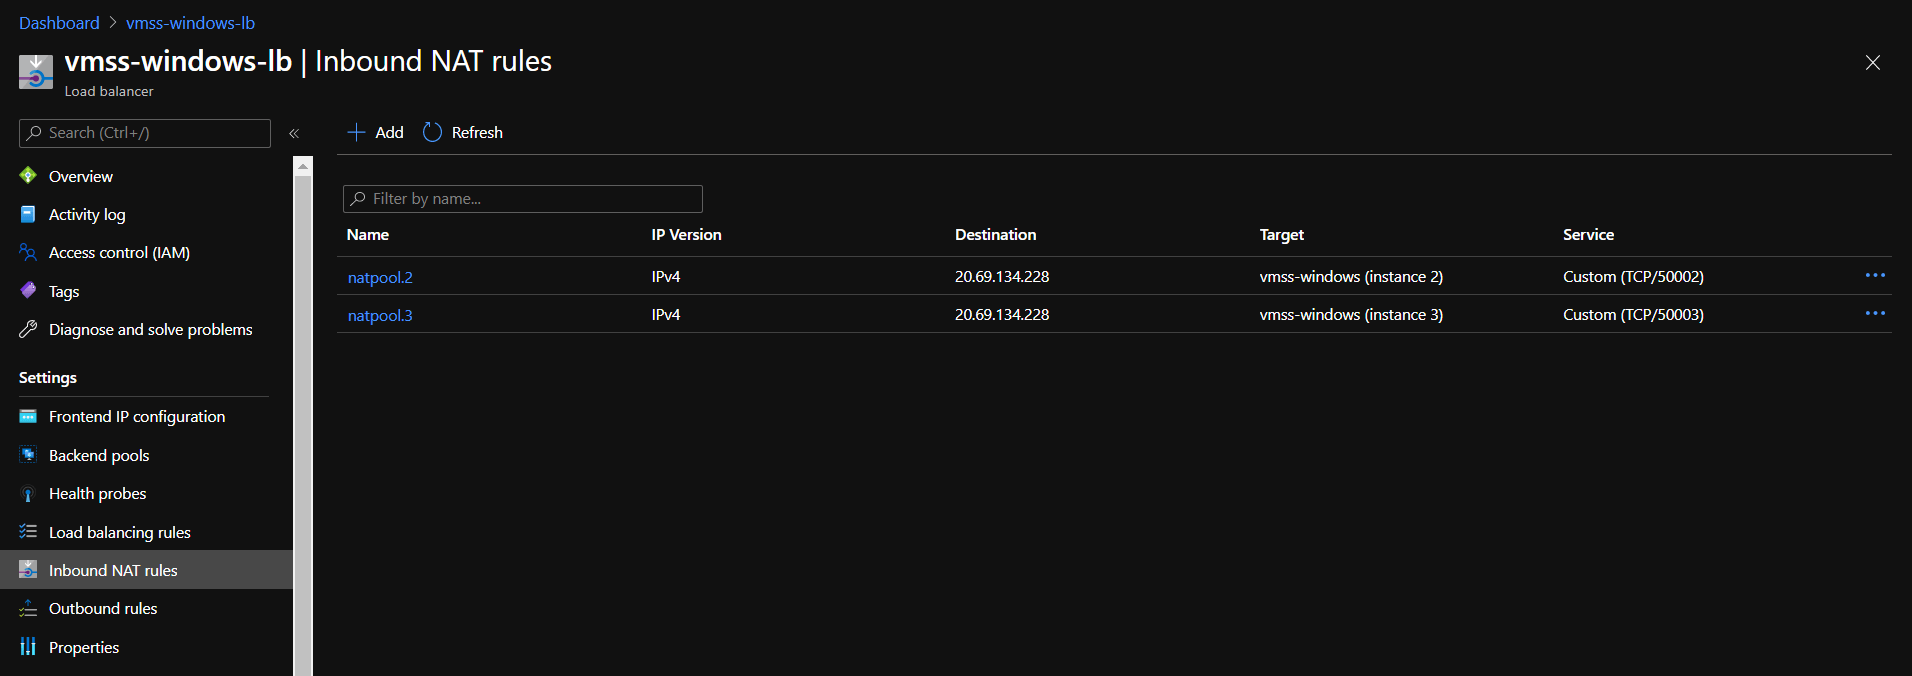
Below is an example how it looks like for a load balancer for VMSS with two instances. For instance, if we open one of the rules we’ll see a rule which states that all requests over TCP which arrive at IP 20.69.134.228 at port 50002 should be forwarded to VMSS instance 2 at port 3389 (or 22 for SSH).
ARM Templates View
Below is shown how inbound NAT pool should be set up using ARM templates.
In Load balancer template we should define a pool in inboundNatPools section:
{
    "type": "Microsoft.Network/loadBalancers",
    "...": "...",
    "properties": {
        "...": "...",
        "inboundNatPools": [
            {
                "name": "natpool",
                "properties": {
                    "frontendPortRangeStart": 50000,
                    "frontendPortRangeEnd": 50119,
                    "backendPort": 3389,
                    "protocol": "Tcp",
                    "idleTimeoutInMinutes": 4,
                    "enableFloatingIP": false,
                    "enableTcpReset": false,
                    "frontendIPConfiguration": {
                        "id": "[concat(resourceId('Microsoft.Network/loadBalancers', parameters('loadBalancerName')), '/frontendIPConfigurations/LoadBalancerFrontEnd')]"
                    }
                }
            }
        ]
    }
}
Virtual machine scale set template should contain a link in loadBalancerInboundNatPools to the pool defined above.
{
    "type": "Microsoft.Compute/virtualMachineScaleSets",
    "...": "...",
    "properties": {
        "...": "...",
        "virtualMachineProfile": {
            "...": "...",
            "networkProfile": {
                "networkInterfaceConfigurations": [
                    {
                        "name": "...",
                        "properties": {
                            "...": "...",
                            "enableIPForwarding": false,
                            "ipConfigurations": [
                                {
                                    "name": "...",
                                    "properties": {
                                        "...": "...",
                                        "loadBalancerInboundNatPools": [
                                            {
                                                "id": "[concat(parameters('loadBalancerId'), '/inboundNatPools/natpool')]"
                                            }
                                        ]
                                    }
                                }
                            ]
                        }
                    }
                ]
            }
        }
    }
}
Network Security Group
Network Security Group (NSG) associated with your VMSS describes what inbound and outbound requests are allowed for your virtual machines. For example, inbound rules by default allow requests from the virtual network and load balancer infrastructure.
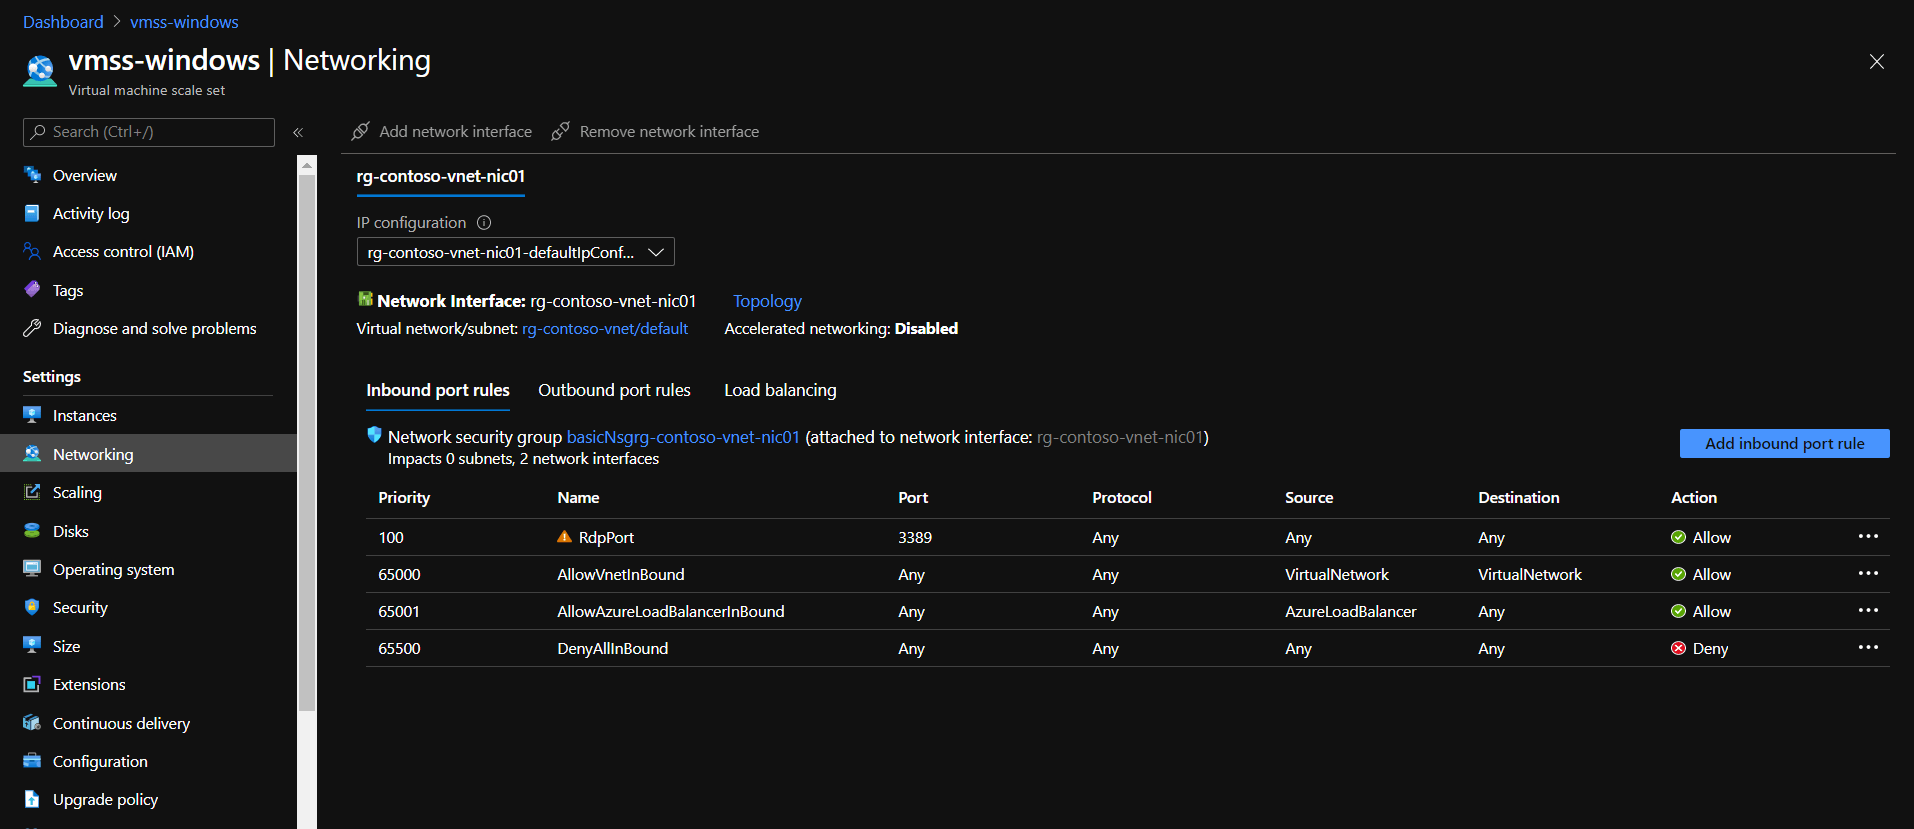
To enable RDP or SSH we need to create a rule to allow connection to the corresponding ports. It could be done in “Networking” tab of a VMSS resource.
On the screenshot below we can see a rule that allows connections to the 3389 port on the virtual machines.
NOTE: The warning sign is displayed because RDP port is exposed to the Internet which is not secure.
 VMSS network security group rules
Establishing Connection
To connect to a particular virtual machine inside of a scale set we just need to know what port on load balancer’s public IP address to use to be forwarded to the desired instance of VMSS.
One easy way to do it is to navigate to load balancer “Inbound NAT rules” tab and see the mapping. For example, to connect to instance 2 on the screenshot above we should use 20.69.134.228:50002.
Another option is to go to an individual VM, its “Connect” tab, then “RDP” and select “Load balancer public IP address” in the dropdown. It will autocomplete “Port number” for you, and this should work both for Windows and Linux VMSS.
Making It More Secure
Considering the warning that appears when we create a new inbound port rule in NSG, it is really not a very good idea to have an RDP or SSH port open to the Internet in production environment. This could work for dev and test purposes but it is better not to have such thing in production.
Therefore, we should restrict from where connections can be established. For example, we could only allow connections from our VPN by specifying a range of addresses associated with it. Read more about NSG rules in documentation.
Another approach to consider is to connect to the virtual machines through a jumpbox which we will discuss in the next section.
Connecting Through Jumpbox
The idea is quite simple, just create a dedicated machine (jumpbox) in the same virtual network that will have connectivity to other virtual machines. All RDP/SSH connections should go though this jumpbox.
This way we don’t need to expose all machines to the Internet and can also implement tighter security measures and audit only on this jumpbox machine.
Let’s see how we can create a jumpbox to connect to our VMSS instances.
Creating Jumpbox
Now we are going to create a virtual machine and place it in the same virtual network. Remember that network security group by default contains an inbound rule that allows requests that are issued from the same virtual network.
So, to create a jumpbox we need to:
- Create a virtual machine
- Associate public IP address with this VM
- Place the VM in the same virtual network (any subnet would work)
- Open RDP/SSH port using NSG rules
NOTE: This setup is done for us automatically when creating though Azure Portal, the only thing needed is to select the correct virtual network. That’s why we won’t cover these steps in detail.
If you want to do it using ARM templates, I would recommend creating a sample resource though Azure Portal and then using “Export template” tab, it would serve as a very good starting point.
IMPORTANT: For production use you should allow remote connections only from known IP addresses, it can be achieved using network security group rules.
Using Jumpbox To Connect
Now our path to the desired virtual machine is a bit longer and goes though the jumpbox:
- Connect to the jumpbox: use public IP address which we can find in “Connect” tab of the virtual machine resource.
- Connect to VMSS instance from jumpbox: use private IP address of a VMSS instance which could be found in “Connect” tab of the corresponding instance.
And that’s basically it!
Using Azure Bastion
Lastly, let’s talk about Azure Bastion. Essentially, this is a managed version of the jumpbox approach discussed in the previous section.
Here are the main points:
- Managed PaaS service which is provisioned inside your virtual network, into subnet named AzureBastionSubnet.
- Gives RDP/SSH capabilities in Azure Portal over TLS. Thus, not all capabilities might be supported since technically only Bastion to VM connection is RDP/SSH.
- RDP/SSH ports are not exposed to the Internet, also, virtual machines don’t need to have public IP addresses. Bastion connects to VM using private IP address.
- Has built-in audit logs, improved security and potential for additional features such as session video recording, etc.
- Internally Azure Bastion is a Virtual Machine Scale Set, this allows it to scale when the number of sessions increases.
- Network Security Group can be applied to AzureBastionSubnet if needed, just make sure your NSG allows necessary traffic as mentioned here.
- Virtual network peering allows to have one Bastion to connect to VMs in different virtual networks
NOTE: As of the time of writing (February 2021) Azure Bastion is available in many though not all regions. To see the current status refer to this page.
Azure Bastion seems to be a good thing and, therefore, you might want to consider using Azure Bastion for enabling RDP/SSH connectivity to your virtual machines.
 Inbound NAT rules