3 Ways To Check If Data Exists Using ADF Data Flow - Azure Data Factory
Data pipelines are complex and often depend on data computed by other pipelines. Therefore, it is useful to have a way to automatically check whether the upstream source has the data which we expect it to provide.
The existence of data in a Mapping Data Flow source can be verified by using one of the following approaches: sampling the data flow source, counting the number of rows, or introducing a row number column and filtering by it. Consequently, the pipeline execution can be aborted if no data is available.
In this post, we will discuss these three ways of how to check if the data flow source contains the data, their pros and cons, and how to fail the pipeline execution if the expectations are not met.
Contents:
- Overview
- A. Approaches To Check If Data Exists Using Data Flow
- B. Fail Pipeline If No Data Exists
- Appendix: Test Data Setup
- Related Posts
- Useful Links
Overview
Data processing is not an easy task. Data pipelines often consist of multiple stages where the output of one stage is the input for another one. Additionally, different stages can be owned by different teams which adds organizational overhead.
If you are developing a data processing pipeline, and it runs periodically expecting fresh data flowing from the upstream source, then you’d want to check if the source contains the expected data and raise an incident if no new data arrives.
This post will cover how to implement the data existence check in Mapping Data Flows of Azure Data Factory. Data flows are data pipelines defined in a visual editor and run on Apache Spark clusters.
Section A covers Mapping Data Flow activity part, in particular, three ways to implement a no-data check using a data flow. These approaches rely on different data flow features: source sampling, aggregate and surrogate key transformations.
Section B is relevant for all three approaches mentioned in section A and describes how to fail Data Factory pipeline execution if our data flow indicates that data doesn’t exist.
A. Approaches To Check If Data Exists Using Data Flow
This section describes 3 different approaches of how to determine whether there are any data/rows in our source or which satisfy some condition. Each approach relies on a different feature of ADF Data Flows and therefore has its differences, see the following subsections for details.
General recommendation would be to use these solutions in the order they listed below.
NOTE: These approaches are not exhaustive but only what I came up based on my experience and research. If you have better ideas, please let me know, would be happy to learn about them!
1. Sample Data Using Source Transformation
In general, sampling is a process of taking samples of something. With regards to data, it means taking a subset of the original dataset based on some criteria, quite often randomly.
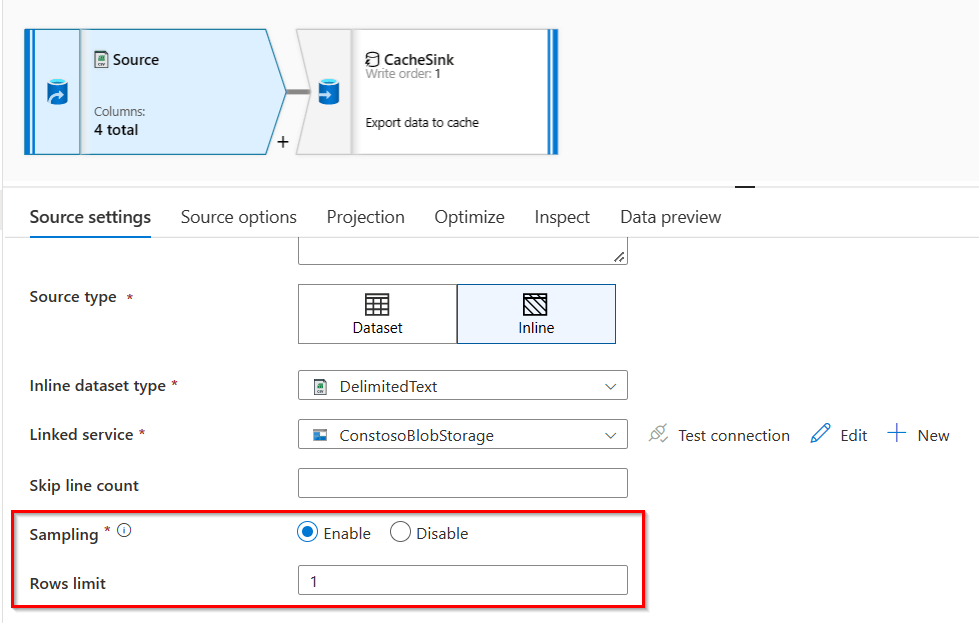
The solution described in this section leverages the sampling feature of the data flow source transformation. When sampling is enabled, we also specify how many rows we want to take.
Pros:
- Little data is loaded, therefore, faster processing - for example, if we want to check that there is any data at all, then we can sample just one row.
- Possible to filter by file last modified timestamp - useful if we want to check data in files within some time range.
Cons:
- Advanced filtering is not possible - for example, if we have a dataset of users and want to check if it contains users from a particular country, then sampling approach wouldn’t work and approach #2 is a better option.
To abort the pipeline when no data is present, follow the rest of the setup in B. Fail Pipeline If No Data Exists section.
Example Of Data Flow Source Sampling
To understand the example, we’ll look at both the code definition as well as the screenshot of the data factory authoring screen.
Data flow transformations in order:
- Source - source transformation which uses
Samplingwith a row limit set to1in “Source settings” tab, optionally can specify date range inFilter by last modifiedin “Source options” tab; data fields used in the example are described in Test Data Setup section. - CacheSink - sink transformation of type
Cache, the sink configuration is identical among all three options; details are covered in the B. Fail Pipeline If No Data Exists section.
Data Flow definition in the data flow script representation, you can paste this code into your data flow definition window (icon at top right corner):
Data Flow Scrip Code - Click to expand
source(output(
        updatedAt as timestamp 'yyyy-MM-dd\'T\'HH:mm:ss\'Z\'',
        id as integer,
        firstName as string,
        lastName as string
    ),
    useSchema: false,
    allowSchemaDrift: true,
    validateSchema: false,
    limit: 1,
    ignoreNoFilesFound: false,
    format: 'delimited',
    container: 'data',
    fileName: ('records.csv'),
    columnDelimiter: ',',
    escapeChar: '\\',
    quoteChar: '\"',
    columnNamesAsHeader: true) ~> Source
Source sink(validateSchema: false,
    skipDuplicateMapInputs: true,
    skipDuplicateMapOutputs: true,
    store: 'cache',
    format: 'inline',
    output: false,
    saveOrder: 1) ~> CacheSink
Data Factory authoring page screenshot of the source transformation:
 Source transformation with sampling
2. Count Rows Using Aggregate Transformation
A simple and intuitive way to check whether data exists is to count the number of rows - if there are zero rows then data is not there.
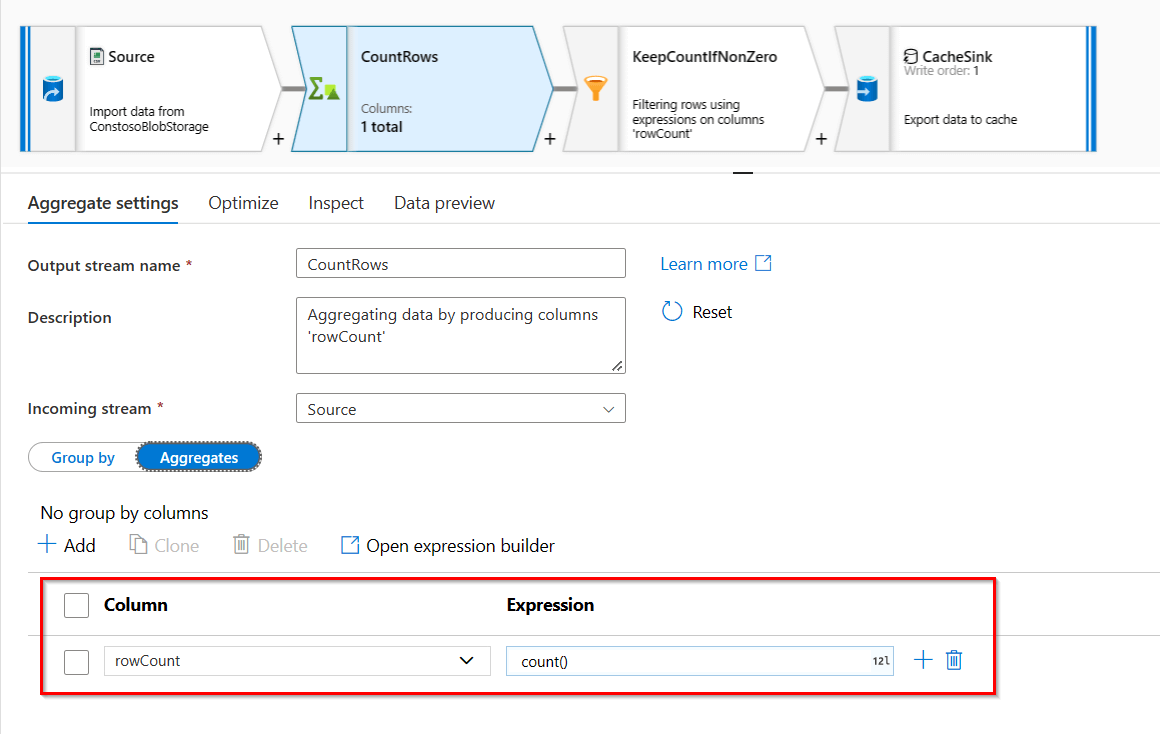
Row count can be determined by using aggregate transformation. To count rows, simply specify a column with a value count() in the “Aggregate” tab.
NOTE: Specifying columns in the “Group by” tab of the aggregate transformation is optional, and in this case we don’t use this grouping functionality.
Pros:
- Possible to apply arbitrary filtering or condition - for example, read data from source, filter by any column(s) and then check whether the there are any rows in the result.
- Lightweight - count operation itself is fast since it doesn’t require shuffling, i.e. moving data between nodes across the network.
- Total number of rows is known and can be usedl for monitoring purposes.
Cons:
- Data still needs to be loaded from the source and processed.
To abort the pipeline when no data is present, follow the rest of the setup in B. Fail Pipeline If No Data Exists section.
Example Of Counting Rows
Data flow transformations in order:
- Source - source transformation which specifies data source and its settings, optionally can set
Filter by last modifiedin “Source options” tab; data fields used in the example are described in Test Data Setup section. - CountRows - aggregate transformation without “Group by” columns but with
rowCountcolumn with a valuecount()defined in “Aggregates” tab; see the screenshot below. - KeepCountIfNonZero - filter transformation that keeps the result only if
rowCount > 0, otherwise the output of filtering is empty (this is needed to be able to abort the pipeline). - CacheSink - sink transformation of type
Cache, the sink configuration is identical among all three options; details are covered in the B. Fail Pipeline If No Data Exists section.
Data Flow definition in the data flow script representation, you can paste this code into your data flow definition window (icon at top right corner):
Data Flow Scrip Code - Click to expand
source(output(
        updatedAt as timestamp 'yyyy-MM-dd\'T\'HH:mm:ss\'Z\'',
        id as integer,
        firstName as string,
        lastName as string
    ),
    useSchema: false,
    allowSchemaDrift: true,
    validateSchema: false,
    ignoreNoFilesFound: false,
    format: 'delimited',
    container: 'data',
    fileName: ('records.csv'),
    columnDelimiter: ',',
    escapeChar: '\\',
    quoteChar: '\"',
    columnNamesAsHeader: true) ~> Source
Source aggregate(rowCount = count()) ~> CountRows
CountRows filter(rowCount > 0) ~> KeepCountIfNonZero
KeepCountIfNonZero sink(validateSchema: false,
    skipDuplicateMapInputs: true,
    skipDuplicateMapOutputs: true,
    store: 'cache',
    format: 'inline',
    output: false,
    saveOrder: 1) ~> CacheSink
Data Factory authoring page screenshot of the aggregate transformation:
 Aggregate transformation to count number of rows
3. Add Row Number Using Surrogate Key Transformation
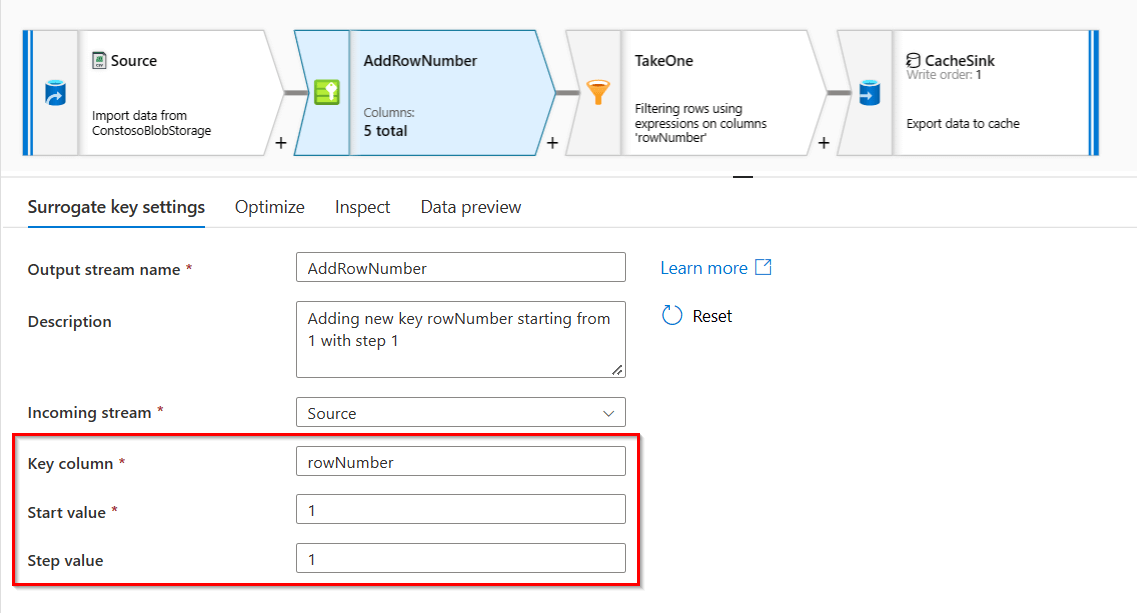
The third solution we are going to discuss assigns a row number to each row by leveraging surrogate key transformation, and then takes only the first row, the row with a number equal to 1.
NOTE: I’d recommend using solutions #1 or #2 over the current one (#3) in most cases due to performance reasons. However, if you have little data then this approach works too. Mainly added this solution to show different options of solving the same problem.
Pros:
- Simple to understand, the intuition is taking a single row from the dataset, you might be familiar with
takeorlimitoperations in other languages. - Possible to apply advanced filtering or condition - same as in solution #2.
Cons:
- Assigning a rank/number to each row likely requires coordination between partitions/nodes since ranks are unique; this means that this solution would be less efficient than #1 and #2.
To abort the pipeline when no data is present, follow the rest of the setup in B. Fail Pipeline If No Data Exists section.
Example Of Adding Row Number
Data flow transformations in order:
- Source - source transformation which specifies data source and its settings, optionally can set
Filter by last modifiedin “Source options” tab; data fields used in the example are described in Test Data Setup section. - AddRowNumber - surrogate key transformation which adds
rowNumbercolumn with values starting from 1 with a step equal to 1, e.g.1,2,3, etc. - TakeOne - filter transformation which only keeps records with
rowNumber == 1, and since we start numbering from1, this is basically the first row. - CacheSink - sink transformation of type
Cache, the sink configuration is identical among all three options; details are covered in the B. Fail Pipeline If No Data Exists section.
Data Flow definition in the data flow script representation, you can paste this code into your data flow definition window (icon at top right corner):
Data Flow Scrip Code - Click to expand
source(output(
        updatedAt as timestamp 'yyyy-MM-dd\'T\'HH:mm:ss\'Z\'',
        id as integer,
        firstName as string,
        lastName as string
    ),
    useSchema: false,
    allowSchemaDrift: true,
    validateSchema: false,
    ignoreNoFilesFound: false,
    format: 'delimited',
    container: 'data',
    fileName: ('records.csv'),
    columnDelimiter: ',',
    escapeChar: '\\',
    quoteChar: '\"',
    columnNamesAsHeader: true) ~> Source
Source keyGenerate(output(rowNumber as long),
    startAt: 1L,
    stepValue: 1L) ~> AddRowNumber
AddRowNumber filter(rowNumber == 1) ~> TakeOne
TakeOne sink(validateSchema: false,
    skipDuplicateMapInputs: true,
    skipDuplicateMapOutputs: true,
    store: 'cache',
    format: 'inline',
    output: false,
    saveOrder: 1) ~> CacheSink
Data Factory authoring page screenshot of the surrogate key transformation:
 Surrogate key transformation to assign a row number for each row
B. Fail Pipeline If No Data Exists
In this section, we cover how to abort the pipeline if we detect that data is missing. This setup works with any of the three solutions described in the previous section.
Pipeline activities in order:
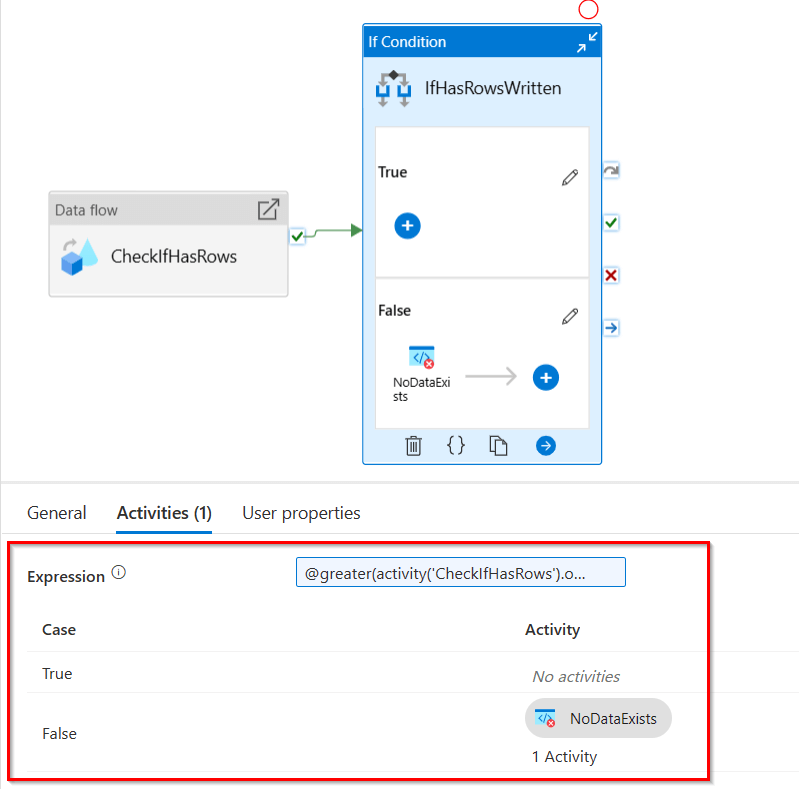
- CheckIfHasRows - mapping data flow activity which invokes one of the data flows: sampling (#1), total count (#2), or row number (#3) which we discussed above.
- IfHasRowsWritten - if condition activity to check whether any rows were written to the sink in the data flow activity, i.e.
rowsWritten > 0:@greater(activity('CheckIfHasRows').output.runStatus.metrics.CacheSink.rowsWritten, 0)- True: some rows were written, this means that data exists; in this example we do nothing and the pipeline completes with the status
Succeeded. - False: NoDataExists - fail activity to abort the pipeline execution, the status will be
Failed.
- True: some rows were written, this means that data exists; in this example we do nothing and the pipeline completes with the status
Here’s a screenshot of how the data factory pipeline looks like in the editor UI:
 If Condition to fail pipeline if no data found
Below is the JSON representation of the pipeline, you can paste this code into your editor (icon at top right corner), just make sure to specify your current pipeline name on the first line:
Pipeline JSON Code - Click to expand
{
    "name": "SamplingPipeline",
    "properties": {
        "activities": [
            {
                "name": "CheckIfHasRows",
                "type": "ExecuteDataFlow",
                "dependsOn": [],
                "policy": {
                    "timeout": "0.12:00:00",
                    "retry": 0,
                    "retryIntervalInSeconds": 30,
                    "secureOutput": false,
                    "secureInput": false
                },
                "userProperties": [],
                "typeProperties": {
                    "dataflow": {
                        "referenceName": "CheckIfHasRowsSamplingDF",
                        "type": "DataFlowReference"
                    },
                    "compute": {
                        "coreCount": 8,
                        "computeType": "General"
                    },
                    "traceLevel": "Fine"
                }
            },
            {
                "name": "IfHasRowsWritten",
                "type": "IfCondition",
                "dependsOn": [
                    {
                        "activity": "CheckIfHasRows",
                        "dependencyConditions": [
                            "Succeeded"
                        ]
                    }
                ],
                "userProperties": [],
                "typeProperties": {
                    "expression": {
                        "value": "@greater(activity('CheckIfHasRows').output.runStatus.metrics.CacheSink.rowsWritten, 0)",
                        "type": "Expression"
                    },
                    "ifFalseActivities": [
                        {
                            "name": "NoDataExists",
                            "type": "Fail",
                            "dependsOn": [],
                            "userProperties": [],
                            "typeProperties": {
                                "message": "No data exists for the specified time period",
                                "errorCode": "ERR_NO_DATA"
                            }
                        }
                    ]
                }
            }
        ],
        "annotations": [],
        "lastPublishTime": "2023-01-13T04:04:36Z"
    },
    "type": "Microsoft.DataFactory/factories/pipelines"
}
Appendix: Test Data Setup
To have a working example of the data flows, we need some data to play with in our pipeline.
The setup is simple - two csv files in a storage account which is linked to Azure Data Factory:
-
Data is stored in a blob storage, in a container named
data. - File
records.csv- a sample file with 3 records (first row is a header):updatedAt,id,firstName,lastName 2023-01-08T19:18:32Z,13642,John,Smith 2023-01-03T21:53:00Z,64830,Anne,Doe 2023-01-01T10:52:17Z,87962,Mike,Howe - File
empty.csv- an empty file (first row is a header) to test whether the pipeline is aborted:updatedAt,id,firstName,lastName
Related Posts
- Dates & Timestamps In Azure Data Factory: Parsing, Formatting, Converting - Pipeline & Data Flow
- Pass Parameters To Azure Function From Data Factory: Body, Query, Headers, Path
Useful Links
- Mapping data flows - Azure Data Factory
- Source transformation in mapping data flow - Azure Data Factory
- Sink transformation in mapping data flow - Azure Data Factory
- Filter transformation in mapping data flow - Azure Data Factory
- Aggregate transformation in mapping data flow - Azure Data Factory
- Surrogate key transformation in mapping data flow - Azure Data Factory